External(Python) Attributes
Categories:
This attribute plugin for the open source seismic interpretation platform OpendTect allows attributes to be developed in Python.
Description
With this plugin it is possible to calculate single and multitrace attributes using a Python script. The plugin supports multi-trace multi-attribute input and multi-attribute output as well as parallel execution.
NOTE: Releases prior to 6.0.2 allowed multi-trace multi-attribute input only if all the attributes were in the same multi-attribute volume. In releases from 6.0.2 onward this limitation has been removed.
Instead of doing the attribute calculation within OpendTect this plugin starts up a Python interpreter and runs a user specified Python script. Trace data is read/written to/from the Python script using stdin/stdout pipes. As described below the Python script must import the extattrib.py module that handles the stdin/stdout data IO and presents the trace data as a numpy array. The script must implement a doCompute method and define a Python dictionary describing the User Interface. Details are described below. Tips and Tricks to assist can be found in various Blog Posts . When WMPlugins is installed a number of Python attribute scripts for everything from dip estimation to filtering are installed into the bin/python/wmpy folder of the OpendTect installation. These are described in the External Attributes section of this documentation.
Input Parameters
This attribute has 3 required parameters and optional parameters determined by the Parameters Dictionary provided by the Python attribute script:
| NAME | DESCRIPTION |
|---|---|
| Interpreter | The Python interpreter to be used to run the script, eg /usr/bin/python3. As of version 6.6.1 and 6.4.13 this field will default to the OpendTect Python settings |
| External File | The external application to be used for attribute calculation. As of version 6.6.1 and 6.4.13 this field will default to the OpendTect/bin/python/wmpy folder. |
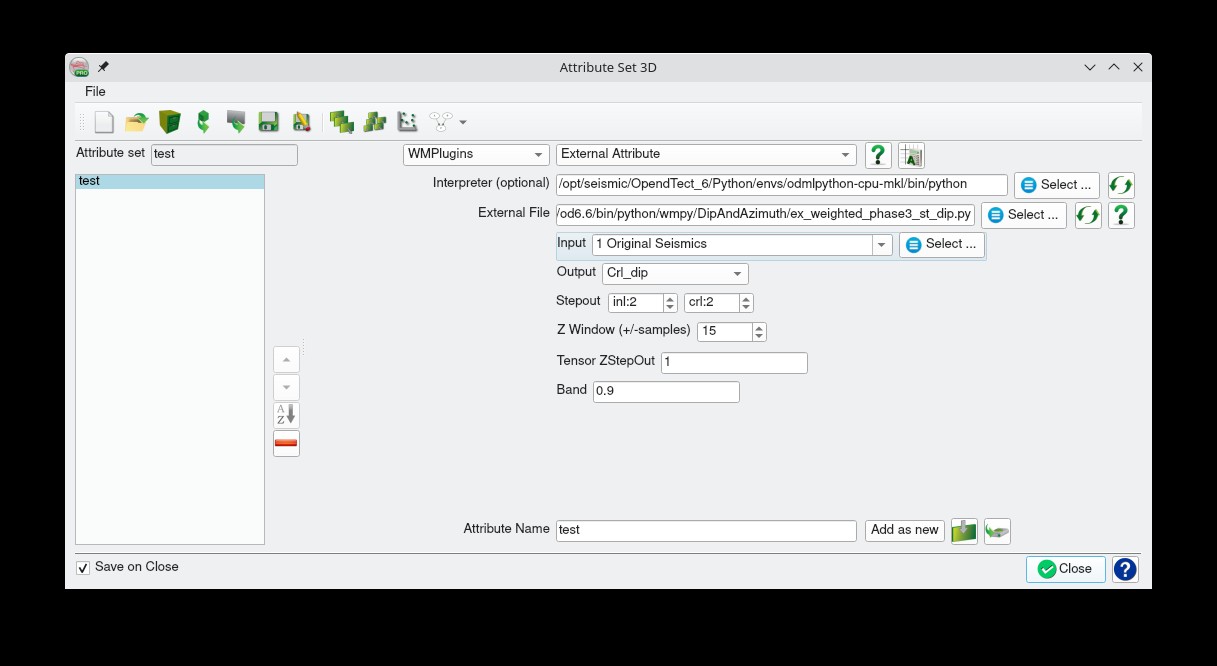
External Attribute Plugin input parameters
The  button beside the Interpreter entry will force an update of the Interpreter field to the current OpendTect Python
setting. This can be useful if you use the Python Settings dialog to change the default interpreter and want to apply the change within
the attribute definition.
button beside the Interpreter entry will force an update of the Interpreter field to the current OpendTect Python
setting. This can be useful if you use the Python Settings dialog to change the default interpreter and want to apply the change within
the attribute definition.
The button beside the External File entry will force reloading the attribute script and rebuild the user interface.
This can be useful if you are editing a script, save it and want to verify the changes.
The  button beside the External File entry will open the system web browser with the url specified by the Help entry in
the attribute scripts Parameters Dictionary. The button is not displayed if this entry is absent.
button beside the External File entry will open the system web browser with the url specified by the Help entry in
the attribute scripts Parameters Dictionary. The button is not displayed if this entry is absent.
Python Script Structure
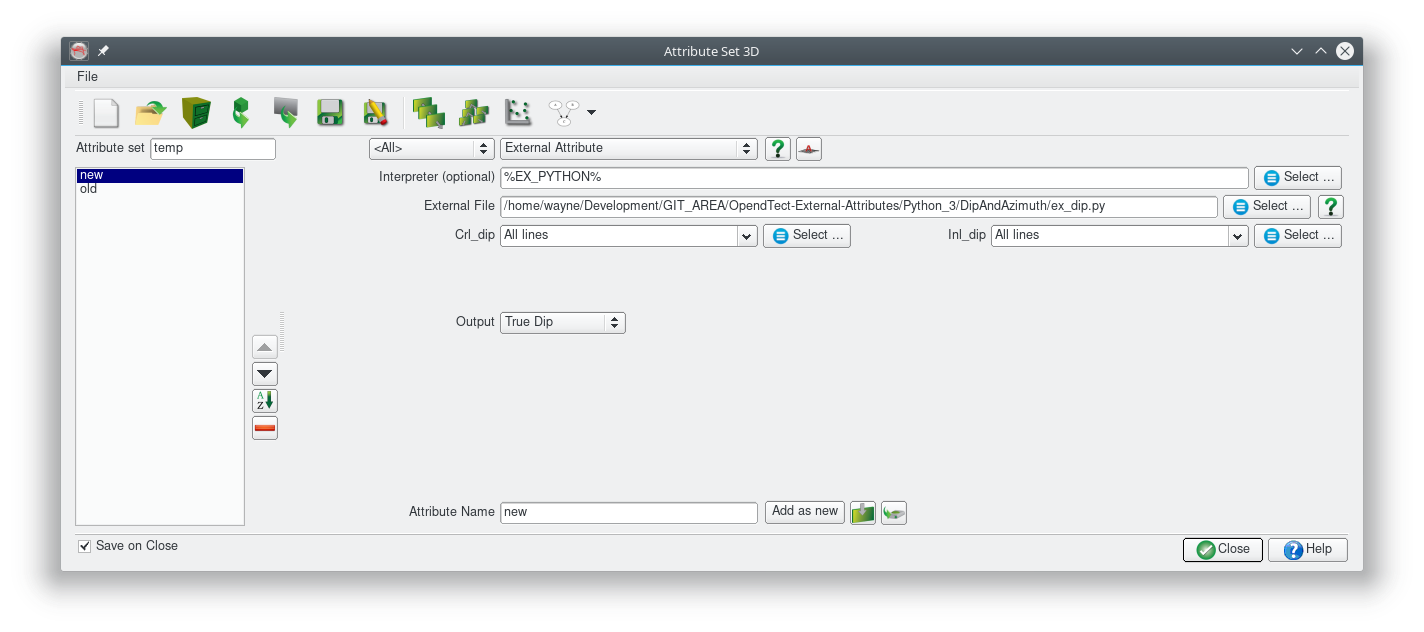
Every Python attribute script has 5 sections. As an example consider the ex_dip.py script which converts inline and crossline dip to true dip and dip azimuth. It is an example of multi attribute, single trace input and output. Some basic understanding of Python and Numpy is assumed.
The Imports

This is where external modules/libraries required by the script are loaded. At a minimum the script must load:
- the Python sys and os modules
- the Numpy module (the fundamental package for scientific computing with Python)
- the external attribute module (extattrib.py)
Generally sys, os and Numpy will be part of the Python installation. The extattrib module is part of the [External Attributes] package and it will be installed into the bin/python/wmpy of the OpendTect software installation if WMPlugins is installed from the OpendTect Installation Manager. As of 7.0.5 this plugin will run the external attribute scripts in an environment where the OpendTect bin/python folder is on the PYTHONPATH. Also, if either of the environment variables OD_APPL_PLUGIN_DIR and OD_USER_PLUGIN_DIR are defined then any existing bin/python folder in those locations will also be added to the PYTHONPATH of the scripts environment. In 7.0.4 and earlier the user must ensure the location of the extattrib module is explicitly set. In the figure above a sys.path.insert call on line 11 ensures the default search path for Python modules includes the parent folder of the folder containing the script. This reflects the folder structure of the WMPlugins package. Use an appropriate set of arguments for your specific installation.
Of course if your script requires other Python modules (eg SciPy, Numba) then add the appropriate import statements in this section.
The Parameters

The xa.params global dictionary describes the input parameters for the script. This is used by the plugin to build a user interface that is shown in the OpendTect Attribute Decription Editor. This attribute is very simple specifying just 2 input volumes and 2 output volumes and a url for documentation. The plugin dynamically builds the following user interface for this script:
A variety of other input elements can be specified to build more complex UI’s. See Parameters Dictionary for full details or look at other scripts to see what is possible.
The Compute Loop Initialisation

The doCompute function is where the attribute calculation occurs. The function is divided into 2 parts some initialisation and the “while True:” loop, discussed in the next section, where the calculations actually take place. Any code in this initialisation section will be executed just once when the attribute script is run and is a good place to calculate constants for use in the Compute Loop.
This particular script shows how information stored in the SeismicInfo Block can be used to calculate some constants purely as an example. This attribute is so simple that no initialisation is actually required.
Also, as on 7.0.5, some additional metadata is available within this function from the xa.params dictionary:
| KEYWORD | TYPE | CONTENT |
|---|---|---|
| Survey | string | The current survey name |
| SurveyDiskLocation | string | The full path to the survey/project folder |
| InputNames | list[string] | The input data set names |
The Compute Loop

This is where the attribute calculation takes place. The xa.doInput() and xa.doOutput() function calls control the input and output of seismic trace data between the script and OpendTect. Generally these should be the first and last statements within the compute loop.
Within the compute loop, some information about the current trace data such as the number of samples and the inline and crossline location are provided in the TraceInfo Block. These can be accessed using constructs like xa.TI[’nrsamp’]. This information is not required for this particular script.
The global Numpy array xa.Input contains the input trace data. xa.Input[’name of input attribute’] returns a Numpy array with the trace data for the current compute location. The shape of this Numpy array depends on the traces stepouts required by the attribute. As this particular script uses just single trace input (inline and crossline step out of 0) the Numpy array has a shape of (1,1,xa.TI[’nrsamp’]). In the more general case of a multi-trace attribute the Numpy array shape would be (xa.SI[’nrinl’], xa.SI[’nrcrl’], xa.TI[’nrsamp’]) and the input trace at the current location would be at the centre of the array, ie at index [xa.SI[’nrinl’]//2, xa.SI[’nrcrl’]//2,…].
Attribute ouput must be put into the xa.Output global Numpy array before the xa.doOutput() function call. Each element (eg xa.Output[’name of output attribute’]) of the output array must have a shape of (1,1,xa.TI[’nrsamp’])
The Postamble

This section is just boilerplate code that appears in every attribute script which should never be changed.
Parameters Dictionary
The Python script can specify a set of parameters as a Python dictionary. As of Release 6.6.8 the format of the Parameters dictionary string has changed to better support more flexible UI’s. In particular the restriction on no whitespace in the keys and values in the dictionary keys has been removed. Scripts using the Legacy format (Select and Par_0 to Par_5) should continue to work. The following keywords are supported:
Inputs Keyword
| KEYWORD | Inputs |
|---|---|
| TYPE | List of Strings |
| DESCRIPTION | Each string is used as a label for an input attribute selection UI element. Currently limited to a maximum of 6 attribute inputs. |
| EXAMPLE | Inputs: [Input 1,Input 2,Input 3] |
Output Keyword (optional)
| KEYWORD | Output (optional) |
|---|---|
| TYPE | List of Strings |
| DESCRIPTION | Each string specifies the name of an output attribute. If this keyword is not supplied a single output attribute is assumed. |
| EXAMPLE | Output: [Out 1,Out 2,Out 3] |
ZSampMargin Keyword (optional)
| KEYWORD | ZSampMargin (optional) |
|---|---|
| TYPE | Dictionary with a ‘Value’ (array of 2 numbers) and optional ‘Hidden’ (boolean) and ‘Symmetric’ (boolean) keys. |
| DESCRIPTION | The 'Value' parameter is an array of 2 numbers specifying the desired minimum number of samples before and after the calculation point required for the calculation respectively. If not supplied only a single value will be provided when the attribute is computed on a timeslice or horizon. The optional ‘Hidden’ parameter is a boolean which if set to true makes the ZSampMargin parameter read only.The optional 'Symmetric' parameter is a boolean which if true causes only a single entry to be displayed in the UI.The optional 'Minimum' parameter is an array of 2 numbers specifying a minimum required window size |
| EXAMPLE | ZSampMargin: {Value: [-2,2]} ZSampMargin: {Value: [-2,2], Symmetric: True} |
StepOut Keyword (optional)
| KEYWORD | StepOut (optional) |
|---|---|
| TYPE | Dictionary with a ‘Value’ (array of 2 numbers) and optional ‘Hidden’ (boolean) keys. |
| DESCRIPTION | The ‘Value’ parameter is an array of 2 numbers specifying the inline and crossline stepout defining the block of traces to be used around the current calculation position. If not supplied only a single trace is provided. The optional ‘Hidden’ parameter is a boolean which if set to true makes the StepOut parameter read only. The optional ‘Minimum’ parameter is an array of 2 numbers specifying a minimum required stepout. |
| EXAMPLE | StepOut: {Value: [2,2]}StepOut: {Value: [2,2], Hidden: True} |
UI Name String (optional)
| KEYWORD | UI Name String (Introduced in release 6.4.8 - optional) |
|---|---|
| TYPE | Dictionary with a ‘Type’ (string) and ‘Value’ (string or number depending on the ‘Type’ key) keys. |
| DESCRIPTION | In this new entry the main key is the name that will appear in the UI. Note that this can now contain whitespace. The 'Type' parameter describes the input field type. Number, Text (as of 7.0.5), Select and File are supported. Number is for a numeric input box, equivalent to the legacy Par_0 to Par_5 entries but with the advantage that the number and order in the UI is more flexible. Text is for a text input box, Select displays a combo-box, equivalent to the legacy Select entry but with the advantage that there is no restriction on the number and order in the UI. File is a file selection UI.The 'Value' key item sets the default value displayed in the UI. For Number types it is a number, for Text types it is a string, for the Select and File types it is a string. For the File type the Value determines the location where the file selection dialog opens and if a '*' is present the file filter. The File type has a Mode key (as of 7.05) which can be either FileIn, FileOut or Dir which determines what can be selected. For FileIn only exisiting files can be selected. For FileOut new file names can be entered, if an existing file is selected the user is asked to confirm overwrite. For Dir only folders are selectable. |
| EXAMPLE | A File UI Field: {Type: File, Mode: FileIn, Value: Seismics/*.wvlt} A Number UI Field: {Type: Number, Value: 20}A String UI Field: {Type: Text, Value: Some text}A Select UI Field: {Type: Select, Options: [option 1,option 2,option 3],Value: option 2} |
Help Keyword (optional)
| KEYWORD | Help (optional) |
|---|---|
| TYPE | String |
| DESCRIPTION | URL pointing to documentation for the external attribute. Causes an icon help button to be displayed in the UI. |
| EXAMPLE | Help: http://waynegm.github.io/OpendTect-Plugin-Docs/External-Attributes/LPA-Attributes/ |
Parallel Keyword (optional)
| KEYWORD | Parallel (optional) |
|---|---|
| TYPE | Boolean |
| DESCRIPTION | Default is True which allows parallel execution. If set to False then calculations only use a single thread. |
| EXAMPLE | Parallel: False |
MinSamplesPerThread Keyword (optional)
| KEYWORD | MinSamplesPerThread (optional) |
|---|---|
| TYPE | Integer |
| DESCRIPTION | Parallel execution for attributes splits the input along the Z axis and does the calculation for each chunk in a separate thread. The number of threads used depends on this setting, the trace length of the input data and the number of cores in the hardware. The default minimum number of samples is 40. |
| EXAMPLE | MinSamplesPerThread: 30 |
Input Keyword (deprecated)
| KEYWORD | Input (depreciated) |
|---|---|
| TYPE | String' |
| DESCRIPTION | Specifies a label to appear beside the input attribute selection UI element. Superceded by the “Inputs” keyword but is supported for backward compatibility. |
| EXAMPLE | Input: Input Data |
Select Keyword (deprecated)
| KEYWORD | Select (Legacy optional) |
|---|---|
| TYPE | Object with a ‘Name’ (string), ‘Values’ (array of strings) and ‘Select’ (number) parameters. |
| DESCRIPTION | Displays a list box labeled ‘Name’ with options specified in ‘Values’ and default selection being item number ‘Select’. |
| EXAMPLE | Select: {Name: Type, Values: [None, Median, Average], Selection: 0} |
Par_? Keywords (deprecated)
| KEYWORD | Par_0, Par_1, Par_2, Par_3, Par_4, Par_5 (Legacy all optional) |
|---|---|
| TYPE | Object with a ‘Name’ (string) and ‘Value’ (number) parameter. |
| DESCRIPTION | Displays an entry box labeled ‘Name’ with default value ‘Value’. |
| EXAMPLE | Par_0: {Name: First Parameter, Value: 100.0}Par_1: {Name: Second Parameter, Value: 200.0} |
Here is an example parameter string:
{
	'Inputs': ['DT(us/m)', 'DTS(us/m)', 'RHOB(g/cc)'],
	'Output': ['Near', 'Mid', 'Far'],
	'ZSampMargin' : {'Value': [-10,10]},
	'StepOut' : {'Value': [1,1], 'Hidden': true},
	'Near Angle (deg)' : {'Type': 'Number', 'Value' : 6.0},
	'Mid Angle (deg)' : {'Type': 'Number', 'Value' : 20.0},
	'Far Angle (deg)' : {'Type': 'Number', 'Value' : 40.0},
	'Wavelet' : {'Type': 'File','Mode': 'FileIn','Value': 'Seismics/*.wvlt'},
	'Method' : { 'Type': 'Select', 'Options': ['akirich', 'fatti'], 'Value': 'fatti'},
	'Help'  : 'https://gist.github.com/waynegm/84f323ec4aab3961c23d'
}
Tips and Tricks
Cross Platform Setup
Prior to release 5.10 and 6.0.0pre7-1 any attribute set containing external attributes could not be shared between Windows and Linux because the Interpeter and External File input fields contain platform specific file paths.
Release 5.10 and 6.0.0pre7-1 introduced an optional mechanism to support cross platform attribute sets containing external attributes by using environment variables. Consider the following script for starting OpendTect on Linux:
#!/bin/csh -f
setenv DTECT_SETTINGS "$HOME/.od6"
setenv OD_USER_PLUGIN_DIR "$HOME/.od6"
setenv EX_PYTHON "/opt/anaconda3/bin/python"
setenv OD_EX_DIR "$HOME/Development/GIT_AREA/OpendTect-External-Attributes/"
/opt/seismic/OpendTect_6/6.0.0/start_dtect
And an equivalent Windows command file:
@set OD_USER_PLUGIN_DIR=%HOMEPATH%\od6
@set EX_PYTHON=C:\Miniconda3\python.exe
@set OD_EX_DIR=E:\Development\GIT_AREA\OpendTect-External-Attributes\
start "" "C:\Program Files\OpendTect_6\6.0.0\bin\win64\Release\od_start_dtect.exe"
The environment variable EX_PYTHON points to the python interpreter for each platform and entering %EX_PYTHON% into the Interpreter input field ensures the platform appropriate interpreter is used. Any name can be used for the environment variable.
The environment variable OD_EX_DIR points to a root folder below which the attribute script files can be found. The setting in the Linux startup script points to a Linux folder. The corresponding setting in the Windows command file points to the same location via a network share. This environment variable name is hard wired into the code so this variable name cannot be changed. Note that the script files cam be located in subfolders of the OD_EX_DIR folder.
Attribute sets created by release 5.0.10 and 6.0.0pre7-1 and later that use these environment variables will not work in earlier versions of the External Attribute plugin.
OpendTect (Linux) hangs after selecting a Python external attribute in the Attribute Description Editor
This can happen if the Python file has Windows/DOS linebreaks. Use the dos2unix command on the Python file and all should be ok.
Setting up a Python/Numpy/Scipy environment
All the Python environments provided by the OpendTect Installation Manager will work with this plugin although some scripts may require installation of additional packages. Any additional dependencies will usually be described in a README.md file next to the script, in the comments/description at the top of the script file or in the documentation.
Alternatively you can install your own Python/Numpy/Scipy development stack for Python 3 from scratch. Continuum Analytics provide free Python installers for Linux and Windows in Anaconda. There is also a smaller DIY option called Miniconda which allows you to select just the packages you need.
In general you require Python 3 (>=3.7) and compatible Numpy and Scipy. Numba is also highly recommended and required by some of the supplied scripts.
How it Works
The following describes how the plugin works. Most of the details are handled by the extattrib.py module included in the plugin distribution. Python scripts need to import this module, provide a description of the User Interface in the xa.params Python dictionary and a doCompute function that implements the attribute calculation.
- When invoked with a commandline argument of
-gthe application should write out a Parameters Dictionary to stdout as a JSON object describing the attribute parameters and exit. The JSON object is URL encoded. - When invoked with a commandline argument of
-c json-object-stringthe application- should read and parse the contents of
json-object-stringback into the params Python dictionary - read a 40 byte block of binary data from stdin called the SeismicInfo block (described below)
- start an endless loop that:
- reads a 16 byte block of binary data from stdin called the TraceInfo block (described below)
- reads a data block of 4 byte binary floats from stdin that contains the seismic trace data. The size of the data block depends on the content of the SeismicInfo (number of traces and number of inputs) and TraceInfo ( number of samples) blocks
number_of_inputs * number_of_traces * number_of_samples * 4 bytes.
- calculates the attribute output
- writes a data block of 4 byte binary floats to stdout that contains the attribute output. The size of the output data block depends on the content of the TraceInfo ( number of samples) block and the number of output attributes
number_of_samples * number_of_outputs * 4 bytes.
- should read and parse the contents of
SeismicInfo Block
This block of binary data is written to the applications stdin immediately after it is started with the -c argument. It consists of 40 bytes as follows:
| SIZE | FORMAT | INDEX | DESCRIPTION |
|---|---|---|---|
| 4 bytes | integer | nrtraces | number of traces for each input attribute |
| 4 bytes | integer | nrinput | number of input attributes |
| 4 bytes | integer | nroutput | number of output atrributes |
| 4 bytes | integer | nrinl | number of inline traces in the input data block |
| 4 bytes | integer | nrcrl | number of crossline traces in the input data block |
| 4 bytes | float | zstep | trace sampling interval (result of OpendTect API call SI().zstep()) |
| 4 bytes | float | inldist | distance between inlines (result of OpendTect API call SI().inlDistance()</em.) |
| 4 bytes | float | crldist | distance between crosslines (result of OpendTect API call SI().crlDistance()) |
| 4 bytes | float | zFactor | (result of OpendTect API call zFactor()) |
| 4 bytes | float | dipFactor | (result of OpendTect API call dipFactor()) |
TraceInfo Block
This block of binary data is written to the application stdin immediately before each block of trace data. It consists of 16 bytes as follows:
| SIZE | FORMAT | INDEX | DESCRIPTION |
|---|---|---|---|
| 4 bytes | integer | nrsamp | number of samples in each trace within the input data block (OpendTect nrsamples parameter) |
| 4 bytes | integer | z0 | position of first sample in data trace within entire seismic trace ( OpendTect z0 parameter) |
| 4 bytes | integer | inl | inline number of current calculation position |
| 4 bytes | integer | crl | crossline number of current calculation position |
Feedback
Was this page helpful?
Glad to hear it! Please tell us how we can improve.
Sorry to hear that. Please tell us how we can improve.